树莓派 + V2Ray 配置透明网关
March 19, 2022 默认分类
软硬件资源列表
- Raspberry PI 4B (可选其他, 能装linux即可)
- debian 11系统 (可选其他, 建议使用debian 11)
- docker (减少环境部署环节)
- iptables/nftables (本次采用nftables, 据说性能更好)
光猫IP: 192.168.1.1
树莓派IP: 192.168.1.254
根据自己的环境操作时改成自己的ip
前言
需要让一台服务器自带翻墙,不需要配置任何东西就可以翻墙的那种程度,所以我就上网查,99% 的中文资料给的解决方案都是【软路由】不是我歧视这玩意,不管是家用环境还是生产环境,我是不敢使用软路由系统作为主力路由的,一旦出问题,就彻底断网,连上网找解决方案都不行。当然不愿意折腾的也可以使用现成V2rayA
主要是记录如何在将树莓派作为旁路由,配合V2Ray,搭建透明代理,以实现局域网内设备的无感翻墙。
对比
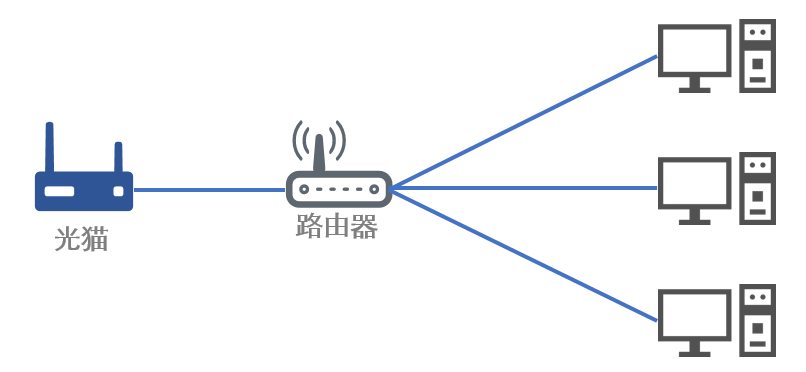
经过认真对比,我选择了透明网关,它和软路由有什么区别呢?打个比方家里只有三台上网设备、一只路由器、一只光猫。如下图所示:
这种情况下如果想要三台上网设备全部都全局翻墙,将路由器替换为软路由就是如下效果:
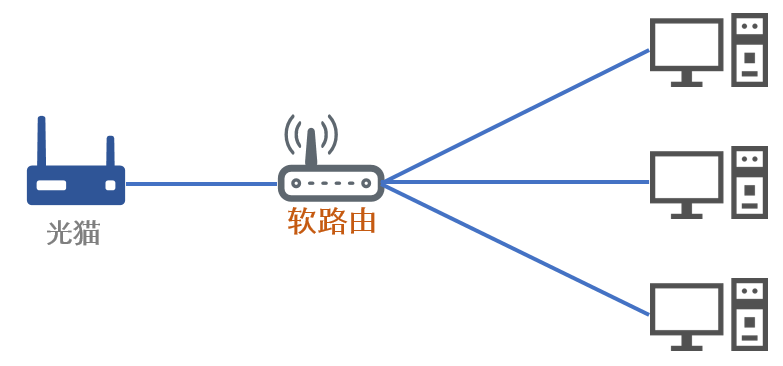
一旦软路由挂了,那所有上网设备都无法连接网络了,这种情况只能将软路由拿出来将路由器直接与上网设备直连来恢复网络。
而透明网关是这样的效果:
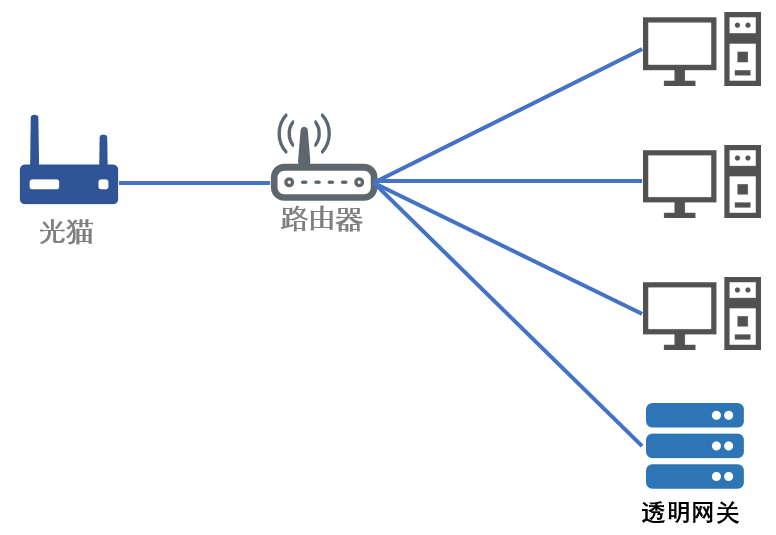
因为透明网关是将流量转发,在失效的时候可以直接使用更上级的网关,不需要修改物理线路,相较之下透明网关的方案更加简单安全。
安装及配置
系统下载及刷写自行处理, 本次均采用root用户执行
安装docker以及docker-compose
# 卸载原有docker
apt-get remove docker docker-engine docker.io containerd runc
# 安装docker软件仓
apt-get update  # debian有点鸡肋, 第一次得更新本地软件源缓存
apt-get install ca-certificates curl gnupg lsb-release  # 安装一些依赖
# 添加docker生产的GPG key
curl -fsSL https://download.docker.com/linux/debian/gpg | sudo gpg --dearmor -o /usr/share/keyrings/docker-archive-keyring.gpg
# 添加docker软件源
echo "deb [arch=$(dpkg --print-architecture) signed-by=/usr/share/keyrings/docker-archive-keyring.gpg] https://download.docker.com/linux/debian $(lsb_release -cs) stable" | sudo tee /etc/apt/sources.list.d/docker.list > /dev/null
# 从新更新本地软件包缓存
apt-get update
# 安装docker
apt-get install docker-ce docker-ce-cli containerd.io
# 启动docker
systemctl enable --now docker
# 安装docker-compose
wget https://github.com/docker/compose/releases/download/v2.3.3/docker-compose-linux-armv7 -O /usr/bin/docker-compose
chmod +x /usr/bin/docker-compose
开启IPV4转发以及最多文件数
echo "net.ipv4.ip_forward = 1" >> /etc/sysctl.conf && sysctl -p
echo >> cat /etc/security/limits.conf <<EOF
root            soft    core            0
root            soft    nofile          65536
root            hard    core            100000
root            hard    nofile          65536
EOF
配置ip相关
# 固定IP
cat > /etc/systemd/network/eth0.network  <<EOF
[Match]
Name=eth0

[Network]
Address=192.168.1.254/24
Gateway=192.168.1.1
EOF
# 添加路由
cat > /etc/systemd/network/lo.network  <<EOF
[Match]
Name=lo

[Route]
Destination=0.0.0.0/0
Table=100
Type=local

[RoutingPolicyRule]
FirewallMark=1
Table=100
EOF
# 禁用dhcp服务
systemctl disable dhcpcd
# 启用网络服务
systemctl enable systemd-networkd
# 禁用avahi自动网络发现功能,类似Bonjure
systemctl disable --now avahi-daemon
# 启用nftables
systemctl enable --now nftables
# 重启生效
reboot
配置DNS
cat > /etc/resolv.conf  <<EOF
# Generated by resolvconf
nameserver 223.5.5.5
nameserver 1.1.1.1
EOF
部署
本次采用docker+docker-compose方式快捷部署, 且自动更新
目录结构
/data
├── ddns
│   └── .ddns_go_config.yaml
├── docker-compose.yaml
├── logs
│   ├── access.log
│   └── error.log
└── v2ray
    └── config.json
配置没啥讲的, 懂得都懂
docker-compose.yaml
version: "3"
services:
  # 自动更新容器镜像版本
  watchower:
    image: containrrr/watchtower:latest
    container_name: watchower
    hostname: watchower
    restart: always
    network_mode: host
    privileged: true
    security_opt:
    - no-new-privileges:true
    volumes:
    - /var/run/docker.sock:/var/run/docker.sock
  # 简单好用的DDNS。自动更新域名解析到公网IP(支持阿里云、腾讯云dnspod、Cloudflare、华为云)
  ddns:
    image: jeessy/ddns-go:latest
    container_name: ddns
    hostname: ddns
    restart: always
    network_mode: host
    privileged: true
    security_opt:
    - no-new-privileges:true
    volumes:
      - /data/ddns:/root
  # 本次主角
  v2ray:
    image: teddysun/v2ray:latest
    container_name: v2ray
    hostname: v2ray
    restart: always
    network_mode: host
    privileged: true
    security_opt:
    - no-new-privileges:true
    volumes:
      - /data/v2ray/config.json:/etc/v2ray/config.json
      - /data/logs:/logs
v2ray配置文件, 记得将出口替换成自己的
config.json
{
  "log": {
    "access": "/logs/access.log",
    "error": "/logs/error.log",
    "loglevel": "error"
  },
  "inbounds": [
    {
      "tag": "transparent",
      "listen": "127.0.0.1",
      "port": 12345,
      "protocol": "dokodemo-door",
      "settings": {
        "network": "tcp,udp",
        "followRedirect": true
      },
      "sniffing": {
        "enabled": true,
        "destOverride": [
          "http",
          "tls"
        ]
      },
      "streamSettings": {
        "sockopt": {
          "tproxy": "tproxy",  // 使用tproxy模式
          "mark": 255          // 打上标志, 防止环路
        }
      }
    }
  ],
  "outbounds": [
    {
      "tag": "trojan",
      "protocol": "trojan",
      "mux": {
        "enabled": true
      },
      "settings": {
        "servers": [
          {
            "address": "根据你的设置更改",
            "method": "根据你的设置更改",
            "ota": false,
            "password": "根据你的设置更改",
            "port": 根据你的设置更改,
            "flow": ""
          }
        ]
      },
      "streamSettings": {
        "network": "tcp",
        "security": "tls",
        "tlsSettings": {
          "allowInsecure": true,
          "serverName": "根据你的设置更改"
        },
        "sockopt": {
          "mark": 255  // 打上标志, 防止环路, 注意每个出口都必须打上
        }
      }
    },
    {
      "tag": "vmess",
      "protocol": "vmess",
      "mux": {
        "enabled": true
      },
      "settings": {
        "vnext": [
          {
            "address": "根据你的设置更改",
            "port": 根据你的设置更改,
            "users": [
              {
                "id": "根据你的设置更改",
                "alterId": 0,
                "security": "根据你的设置更改"
              }
            ]
          }
        ]
      },
      "streamSettings": {
        "network": "ws",
        "security": "tls",
        "tlsSettings": {
          "allowInsecure": false,
          "serverName": "根据你的设置更改"
        },
        "wsSettings": {
          "path": "根据你的设置更改",
          "headers": {
            "Host": "根据你的设置更改"
          }
        },
        "sockopt": {
          "mark": 255  // 打上标志, 防止环路, 注意每个出口都必须打上
        }
      }
    },
    {
      "tag": "vless",
      "protocol": "vless",
      "mux": {
        "enabled": true
      },
      "settings": {
        "vnext": [
          {
            "address": "根据你的设置更改】",
            "port": 根据你的设置更改,
            "users": [
              {
                "id": "根据你的设置更改】",
                "alterId": 0,
                "security": "根据你的设置更改】",
                "encryption": "none",
                "flow": ""
              }
            ]
          }
        ]
      },
      "streamSettings": {
        "network": "ws",
        "security": "tls",
        "tlsSettings": {
          "allowInsecure": false,
          "serverName": "根据你的设置更改"
        },
        "wsSettings": {
          "path": "根据你的设置更改",
          "headers": {
            "Host": "根据你的设置更改"
          }
        },
        "sockopt": {
          "mark": 255 // 打上标志, 防止环路, 注意每个出口都必须打上
        }
      }
    },
    {
      "tag": "direct",
      "protocol": "freedom",
      "streamSettings": {
        "sockopt": {
          "mark": 255  // 直连的也需要打上标志, 防止环路, 注意每个出口都必须打上
        }
      }
    },
    // 流量黑洞, 用于广告屏蔽,或者其他不良网站屏蔽. 做个良好市民
    {
      "tag": "block",
      "protocol": "blackhole",
      "settings": {
        "response": {
          "type": "http"
        }
      }
    },
    {
      "tag": "dns-out",
      "protocol": "dns",
      "streamSettings": {
        "sockopt": {
          "mark": 255  // dns出口的也需要打上标志, 防止环路, 注意每个出口都必须打上
        }
      }
    }
  ],
  // 解决dns污染
  "dns": {
    "servers": [
      {
        "address": "223.5.5.5",
        "port": 53,
        "domains": [
          "geosite:cn",
          "ntp.org"
        ]
      },
      {
        "address": "8.8.8.8",
        "port": 53,
        "domains": [
          "geosite:geolocation-!cn"
        ]
      },
      {
        "address": "1.1.1.1",
        "port": 53,
        "domains": [
          "geosite:geolocation-!cn"
        ]
      }
    ]
  },
  // 主要做了国内外分流, 出口负载
  "routing": {
    "domainStrategy": "IPOnDemand",
    "domainMatcher": "mph",
    // 本次采用比较简单的的负载均衡玩法, 有兴趣的可去官网查看相关文档, 可玩性高
    "balancers": [
      {
        // 出口标签, 类似分组, 在routing中使用到, 可自定义其他的, 控制哪些源ip从哪组出口出去
        "tag": "proxy",
        // 上面 outbounds中的海外出口
        "selector": [
          "trojan",
          "vmess",
          "vless"
        ],
        "strategy": {
          "type": "random"  // 随机负载
        }
      }
    ],
    "rules": [
      // dns 劫持
      {
        "type": "field",
        "inboundTag": [
          "transparent"
        ],
        "port": 53,
        "network": "udp",
        "outboundTag": "dns-out"
      },
      // 时间同步直连
      {
        "type": "field",
        "inboundTag": [
          "transparent"
        ],
        "port": 123,
        "network": "udp",
        "outboundTag": "direct"
      },
      // 国内DNS地址直连, 可自行添加其他的
      {
        "type": "field",
        "ip": [
          "223.5.5.5",
          "114.114.114.114"
        ],
        "outboundTag": "direct"
      },
      // 海外DNS地址直连, 可自行添加其他的
      {
        "type": "field",
        "ip": [
          "8.8.8.8",
          "1.1.1.1"
        ],
        "balancerTag": "proxy"
      },
      // BT直连, 毕竟不是大富大贵人家
      {
        "type": "field",
        "protocol":["bittorrent"],
        "outboundTag": "direct"
      },
      // 自定义走代理
      {
        "type": "field",
        "ip": [
          "geoip:hk",
          "geoip:mo"
        ],
        "balancerTag": "proxy"
      },
      // 国内直连
      {
        "type": "field",
        "ip": [
          "geoip:private",
          "geoip:cn"
        ],
        "outboundTag": "direct"
      },
      // 海外走代理
      {
        "type": "field",
        "domain": [
          "geosite:geolocation-!cn",
          "geosite:google-scholar"
        ],
        "balancerTag": "proxy"
      },
      // 国内直连
      {
        "type": "field",
        "domain": [
          "geosite:cn",
          "geosite:category-scholar-!cn",
          "geosite:category-scholar-cn"
        ],
        "outboundTag": "direct"
      },
      // 匹配不到的全走代理
      {
        "type": "field",
        "port": "0-65535",
        "balancerTag": "proxy",
        "enabled": true
      }
    ]
  }
}
开始部署
# 拉镜像
docker-compose pull
# 启动
docker-compose up -d
配置nftables
# 更改默认规则
cat > /etc/nftables.conf  <<EOF
#!/usr/sbin/nft -f

flush ruleset

table ip nat {
        chain DOCKER {
        }
}

table ip filter {
        chain DOCKER {
        }

        chain DOCKER-ISOLATION-STAGE-1 {
                counter packets 0 bytes 0 return
        }

        chain DOCKER-ISOLATION-STAGE-2 {
                counter packets 0 bytes 0 return
        }

        chain divert {
                type filter hook prerouting priority mangle; policy accept;
                meta l4proto tcp socket transparent 1 meta mark set 0x00000001 accept
        }
}
table ip v2ray {
        chain prerouting {
                type filter hook prerouting priority filter; policy accept;
                ip daddr { 127.0.0.1, 224.0.0.0/4, 255.255.255.255 } return
                meta l4proto tcp ip daddr 192.168.0.0/16 return
                ip daddr 192.168.0.0/16 udp dport != 53 return
                meta mark 0x000000ff return
                meta l4proto { tcp, udp } meta mark set 0x00000001 tproxy to 127.0.0.1:12345 accept
        }

        chain output {
                type route hook output priority filter; policy accept;
                ip daddr { 127.0.0.1, 224.0.0.0/4, 255.255.255.255 } return
                meta l4proto tcp ip daddr 192.168.0.0/16 return
                ip daddr 192.168.0.0/16 udp dport != 53 return
                meta mark 0x000000ff return
                meta l4proto { tcp, udp } meta mark set 0x00000001 accept
        }
}
EOF
# 重启nftables
systemctl restart nftables
使用
局域网内的主机将默认网关修改为透明网关所在的IP就可以实现本机全局自动翻墙,我上面的配置文件将国内流量国外流量自动分流了。客户端不需要做任何特殊设置即可使用。
收尾
至此你已经获得一个透明代理网关, v2ray的可玩性还是非常高的, 可以通过简单的路由配置以达到控制流量走向
彩蛋--网抑云破解
展示如何使用 nondanee/UnblockNeteaseMusic 解锁网易云音乐的灰色歌曲。
下载由 nondanee/UnblockNeteaseMusic 项目的作者提供的证书 。
信任此证书。如果你想让在 LAN 网络的苹果设备也生效, 在 Safari 打开证书 并在设置-通用-描述文件中安装。安装成功后,在设置-通用-关于本机-证书信任设置中信任此证书
在docker-compose.yaml中添加一个容器
  music:
    image: nondanee/unblockneteasemusic:latest
    container_name: music
    hostname: music
    restart: always
    network_mode: host
    privileged: true
    security_opt:
    - no-new-privileges:true
    command: -p 2333 -e https://music.163.com
部署
docker-compose up -d配置规则
编辑v2ray配置文件, 在outbounds增加一个出口
    {
      "tag": "music",
      "protocol": "http",
      "settings": {
        "servers": [
          {
            "address": "127.0.0.1",
            "port": 2333
          }
        ]
      },
      "streamSettings": {
        "sockopt": {
          "mark": 255  // 老规矩, 打上标志, 防止回环
        }
      }
}在routing中的策略rules添加两条规则
      // 从music容器出来流量直连
      {
        "type": "field",
        "outboundTag": "direct",
        "source": [
          "192.168.1.254"   // 修改为本机器的ip地址,
        ],
        "domain": [
          "domain:163.com",
          "domain:netease.com",
          "domain:126.com"
        ]
      }
      // 其他设备的网易云音乐流量转到music出来
      {
        "type": "field",
        "outboundTag": "music",
        "domain": [
          "domain:163.com",
          "domain:netease.com",
          "domain:126.com"
        ]
      }
重启v2ray
docker restart v2ray至此你可以做个白嫖网抑了